
NextCloud calendar for Outlook 2019 #
To import an NextCloud calendar into Outlook, you must first download and install the “Outlook CalDav Synchronizer” add-on. To do this, open the downloaded .zip file and run the “setup” file. Follow the installation wizard to complete the installation.
You also need to create a token in the cloud. To do this, please follow the instructions to create a token.
Open Outlook and right click on Calendar. Create a new calendar with “New Calendar …” and name it in the next window. Click “OK“.

After installing “Outlook CalDav Synchronizer” there should be a new tab with the same name in Outlook. Click on this tab and click on “Synchronization Profiles“.

Create a new profile by clicking on the green “+” at the top left and select “Generic CalDAV/CardDAV” in the next window.

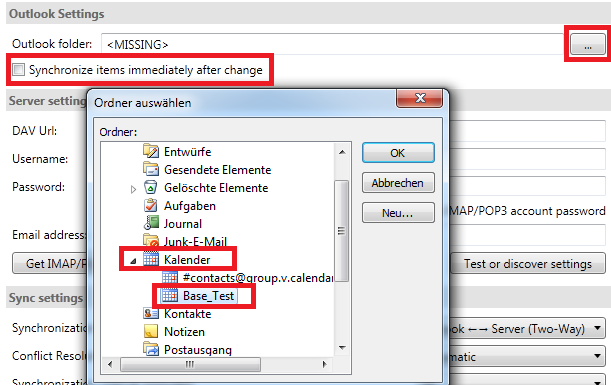
Give the new profile a name of your choice and change the “Outlook Folder” to the calendar you have created. To do this, click on the three dots and select your folder under “Calendar” in the window that opens. In addition, check the box next to “Synchronize items immediately after change“.
Copy the link of your calendar from Nextcloud and paste it into the “DAV URL” field. Click the “pencil icon” to copy the internal link. If you want to add a calendar that has been shared with you, the link can only be copied by the owner of the calendar. For example, if a calendar was shared from a department account, then the link and token must be copied via the department’s u‑account.
Enter the token data as the username/password.
Finally, compare your settings with the following picture:
